In Feb. 2003 when I first joined the Road Star Riders Forum (RSR) [see "Links" page], there were two guys (John & Ken) who made these type tailights using various combinations of turn signals and mountings. They used larger, traditional bullet signals, or more modern-looking LED signals, as well as offering signals mounted at various distances from the side of the tombstone (using different length spacers). They offered the light with the regular bulb it came with, or a Radiantz tombstone LED insert. You could choose how you wanted yours built.
They called their company J&K Starline and had a website showing the various options you could order.
There were a number of forum members who purchased these. It was a nice alternative to the stock Roadstar taillight and signal bar.
Before I got around to deciding if I wanted to order, J&K decided to stop making them in mid-2003.
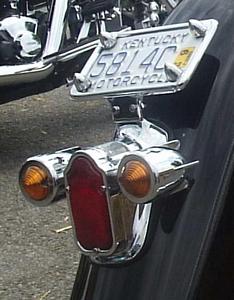
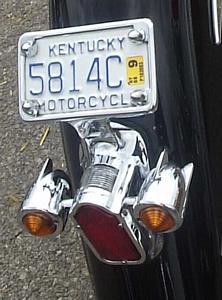
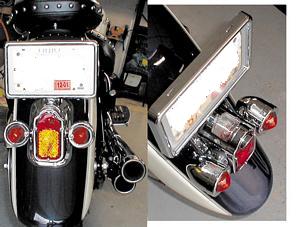
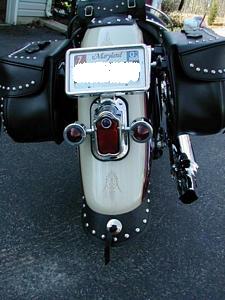
I include here some photos of J&K Starline's original work (from his long-gone web site) - I only have a few saved shots:
Since I could no longer order one from J&K, I decided to build own of my own.
Shown below are the parts needed and the steps to make it.
Unfortunately, I did not take photos when I built this, so I will describe and show you what I can. I do have photos of some extra parts to build another assembly, and I will also include close-up photos of my current assembly to give you a clearer picture. Reading text-only instructions makes it difficult to follow.
Parts Required - Here are the parts required for my particular build/set-up:
|
|
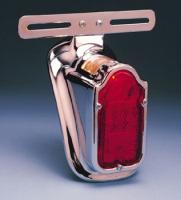
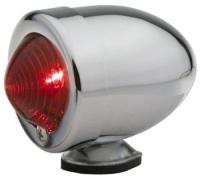
Tombstone Taillight
First, the basic, inexpensive Tombstone taillight - a nice retro look!
Comes with a small bulb. I've always used an LED insert, so I am not sure if the bulb would be sufficiently bright.
J&P Cycles part# 3400085 Price (as of June 2007): $29.99
|
|
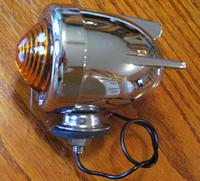
3-Wing Bullet Lights (Amber)
These were available without the wings, but I wanted to add a little bit of a retro-rocket look with the wings.
J&P Cycles part# 27-414 (this 3-winged variety appears to be no longer available)
Alternative bullet lights - same kind of light but without the 3 wings:
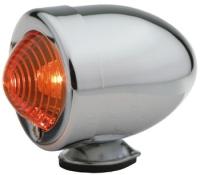
Amber: J&P Part#: 3300585 or 3300586 Price (as of June 2007): $9.99 (sold each - 2 rqd)
Red: J&P Part#: 3300460 or 3300465 Price (as of June 2007): $9.99 (sold each - 2 rqd)
You can also order different color lenses for the bullet lights from J&P Cycles.
|
|
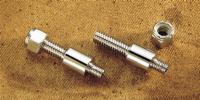
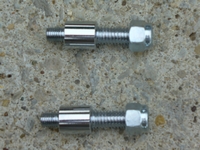
5/8" Spacers (2 per pack)
This is used to set the turn signals off the tombstone 5/8". You can purchase a longer version, I believe.
NOTE: If you decide to mount the bullet lights directly to the tombstone housing, you will not need these spacers.
J&P Cycles part# 3200520 (previously CH-0495) - sold in pairs. One pair required. Price (as of June 2007): $8.99
|
|
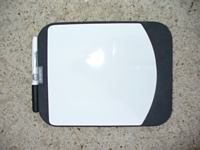
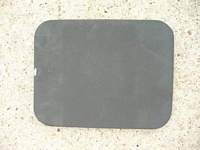
Thick Black Rubber Gasket
Black mouse pad (for the gasket) - or some other kind of thick black, foam rubber.
The tombstone does not fit perfectly against the Roadstar fender - but it's close.
A thick black foam rubber pad cut for the gasket allows what small gaps there are in the profile to be filled as it's tightened down to the fender. The rubber gasket that comes with the tomstone doesn't fill in these gaps - so they show.
I had heard that some people used a grinder to take metal off the tombstone so it will fit better against the curve of the Roadstar fencer. I decided that I'd rather not risk ruining the taillight, so went with the thick rubber alternative.
I've used various materials. Tall drink huggies that are black can have the bottom removed, cut up the side vertically and unrolled to use as the gasket. The standard size huggies (because of their shorter height), when unrolled to use as the gasket, won't span the width of the tombstone.
The two pics to the left show a "Quartet" brand white board mounted on foam rubber that's 7" x 9" and 1/2" thick. After removing the thin whiteboard material and the pen holder, you have yourself an excellent foam rubber gasket material.
|
|
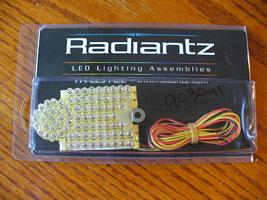
Radiantz LED insert
Custom Dynamics part# 9030-11
Not sure if this is still available as of today's date (June 14, 2007)
|

|
Your stock/original turn signal bulb, bulb socket, and wires - for both sides
I never wanted to use the cheap little bulb in the purchased bullet lights (or figure out how to wire them), so I just took the guts (bulb, bulb socket, wires) out of the stock rear signal housings and used them. Plus, I wanted the turn signals to still have the same brightness and blinking speed.
If you decide to use the bulb set-up that comes with the bullet light, you'll have to experiment to see how to connect the wiring. I have no experience doing this.
|
|
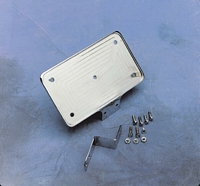
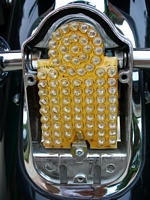
Billet Laydown Plate
Dennis Kirk Part# H27116 (Drag Specialties Part# DS-720134) Price as of June 18 was $57.95 at Dennis Kirk
You can mount your license plate vertically using an inexpensive license frame and backplate. I did this at first, but I wanted a look that was closer to the fender.
So, I did some digging and found this billet laydown produced by Drag Specialites. You will still need to buy a cheap chrome outer frame and bolts/nuts to hold the plate to the billet laydown.
|
How to build it:
|
Step 1:
Dis-assemble the tombstone. Make sure you put all the removed parts together into a large bowl or tray so they don't get misplaced.
|
Step 2:
Determine where you would like the 5/8" spacers to come out of the side of the tombstone's housing, but also consider the internal structure. If you look above at the photo of the 5/8" spacers, the shorter, finer-threaded portion goes inside of the tombstone housing. When assemblying it, visualize the nut going on to the threaded portion inside the housing. You need a relatively flat surface inside the housing for the nut to rest on. This limits where you can locate your signal light extensions.
You can see from the pic that the mounting screw boss for the taillight lense prevents you from locating your hole too low.
|
Step 3:
Take some careful measurements from the front (taillight lens side) of the housing and the top or bottom of the housing. Once you're confident you have the right location, center punch the spot. Then drill a hole large enough for the shorter, finer-threaded portion of the space to clear. Do this for both sides.
|
Step 4:
Debur the holes inside and out.
The 5/8" spacer comes with one nut (for each) that fits the longer, coarse-threaded end. You will need to take one of the spacers to the hardware store and find a finer threaded metric nut to fit the shorter threaded end of the spacer. Buy two with lock washers - stainless steel - one set for each spacer.
|
Step 5:
Disassemble the bullet lights. Make sure you keep the removed parts all together so you don't lose anything.
On the bullet signals, you can set aside the following parts.... You won't be using them:
- the bulb and its socket. Remove the socket from the sheet metal plate to which it is attached (pry it off). You will need the sheet metal plate.
- the oval-shaped steel mounting plate and it's gasket. This is on the outside of the bullet light where the wire(s) come out.
- the small threaded shaft that holds that steel mounting plate, and through which the wires for the light pass.
NOTE: If you decide you want the bullet lights mounted directly to the side of the tombstone, you will want to keep this threaded shaft, mounting plate and gasket, and NOT use the 5/8" spacers.
|
Step 6:
Slide the longer coarse-threaded end of one of the 5/8" spacers into one of the bullet light holes, making sure the sheet metal plate is also in place with that longer coarse-threaded spacer going through it. Hold its nut (the one that came with the spacer) against it and using a sharpie, make a mark on the threaded shaft just at the end of the nut. You want the coarse-threaded shaft to be about flush with the end of the nut once it's tightened down.
Cut the threaded portion of the shaft at the sharpie mark. A Dremel tool with a cut-off disc works well. Otherwise mount the 5/8" space in a vise using padded/rubber vise jaw inserts and carefully cut it with a hacksaw. If you don't use padded/rubber vice jaw inserts, you'll scratch up the smooth portion of the 5/8" spacer, which is the visible part. Debur the ends of the cut shafts.
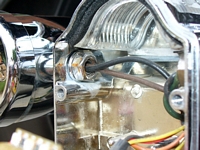
You can see the supplied nut mounted on the cut shaft inside the bullet housing with the signal wires going through..
|
Step 7:
Modify the small sheet metal plate that came from inside the stock bullet.
You'll be going from a plate that looks like this in the stock housing:
To a re-bent plate that will be able to hold the stock tailight in the center of the housing, and allow it to be zip-tied around the bottom of the plate. You'll need to also cut off some of the bottom of the plate where the stock bulb socket was mounted. You can just see a little of the zip-tie at the base of the bulb housing and rubber surround:
Make sure you leave the upper part of the sheet metal plate alone where the outer lense ring screws into.
|
Step 8:
Remove the bulb, socket, wires from your stock, original turn signal bar. you can set aside the stock signal bar and stock bulb housings - you won't be using them.
|
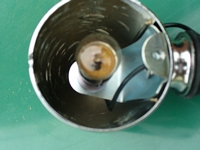
Step 9:
Take the stock Roadstar signal bulb, socket and wires....and zip tie the stock socket (with the stock rubber that surrounds it) to the bottom of the re-bent sheet metal plate.
Now... bring the wires up and feed them through: 1) the spacer nut, then 2) through the re-bent sheet metal plate, then 3) through the hole in the side of the bullet housing, then finally, 4) through the hollow cut-off end of the 5/8" spacer.
Now....push the cut-off threaded end of the spacer through the hole in the bullet housing, through the re-bent sheet metal plate, and then onto its nut.
What you should have now is the stock bulb/socket assembly contained in the center of the bullet housing, the 5/8" spacer secured via its nut inside the housing, and all the stock signal wires coming out of the short, finer-threaded end of the spacer.
Whew....hope you could decipher that! Repeat for both bullet signals.
|
Step 10:
Slide the finer-threaded end fo the 5/8" spacer (the one with the wires now sticking out of it) into the hole you drilled on the side of the tombstone housing, slide its nut on and tighten.
Because of the space limitations inside the housing, I found that I had to file some off the nut to fit inside its confines within the housing, then turn the bullet with spacer to thread it into the spacer nut. Do your best to hold the nut steady with pliers or a small vice-grip. Let the excess wire go out the back of the tombstone. Repeat for both sides.
NOTE: In order to get the spacer's nut to lay properly, you may have to trim/grind some off the bottom of the clear lense on top of the tombstone that shines on your license plate. I can't recall if I had to do this or not.
|
Step 11:
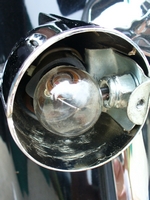
Insert the Radiantz LED tombstone light and let its wires go out the back of the tombstone housing. If you run into any clearance issues, you may have to do some minor grinding/filing on the inside structure to allow the LED insert to lay flat.
My Radiantz fit perfectly between the two taillight lense screw bosses inside the housing. See pic:
This is held in place by a single screw at the bottom center.
Per the Radiantz directions:
Black wire = ground; Orange wire = Running Light; Red wire = Brake; Yellow wires = Right/Left Turn Signals (if you use 1/2 of the tombstone LED as a turn signal - I didn't).
|
Step 13:
Once you have the bullet signals tightened down and oriented properly (not tilted up or down), then you can put the lense and lense ring on the bullet housings. Install the tombstone gasket, lens and trim. |
Step 14:
Gasket:
As I stated above, the tombstone does not fit perfectly against the Roadstar fender - but it's close.
A thick black foam rubber pad cut for the gasket allows what small gaps there are in the profile to be filled as it's tightened down to the fender. The rubber gasket that comes with the tombstone doesn't fill in these gaps - so they show. However, use this gasket as a template to cut a thicker rubber one.
I had heard that some people used a grinder to take metal off the tombstone so it will fit better against the curve of the Roadstar fender. I decided that I'd rather not risk ruining the taillight, so went with the thick rubber alternative. The choice is yours.
I've used various materials. Black mouse pads (for the computer), TALL foam rubber drink huggies that are black can have the bottom removed, cut up the side vertically and unrolled to use as the gasket. The standard size foam rubber huggies are shorter and when unrolled to use as the gasket, aren't wide enough for the width of the tombstone.
Use scissors or an exacto/razor knife. You might want to make some trial cuts on some excess foam rubber you cut off. You need to get a feel for how the material cuts and how you need to do it to get a smooth edge, instead of a choppy/ragged edge.
|
Step 15:
Wiring:
Your turn signal wires will be much too long to connect and tuck under the tombstone. You'll either have to feed them through the gasket and fender hole, connecting them and somehow securing them on the underside of the fender, or
Do like I did and simply cut off the stock ends of the turn signal and taillight wires, retaining the stock push-in connector with a few inches of wire still on it.
Then cut off the rest of the wires to leave just enough for you to connect the just-now-cut-off push-pin ends to the now-shortened wire. I used crimp connectors you can buy at any auto or hardware store. You can aslo use small twist caps, although they may take up too much space when trying to tuck the wires under the tombstone.
This way, you get to just connect your stock push-pins, with the stock wire colors into the stock fender wire harness!
|
Step 16:
Mounting:
Make sure the fender wiring harness end is fed through one of the holes in the fender and the tombstone gasket you cut.
Make sure the same fender wiring harness ends are fed through the tombstone's gasket as well. Coil up what you can under the tombstone, between its housing and the gasket. (This is why you don't want too much wiring still left on the stock wires from the bullets and the taillight.)
Remove the threaded mounting rods that protrude from the bottom of the tombstone. Locate the tombstone on the fender in the location that covers all the holes, except the two tiny ones to the immediate left and right. (The tombstone can NOT cover all the holes.) Re-use the tiny small stainless steel screws that came out of these holes originally to simply plug them. Once ideally located, make a small pencil mark on the fender at the top edge of the tombstone.
Now, pull the tombstone away from the fender, and measure the distance from the top edge of the housing (the edge you just now used to make the pencil mark on the fender), to the center line of where the upper threaded rod screws in. Transfer this measurement to the fender by measuring down the pencil line you just made.
Repeat for where the lower threaded rod screws in, using the measurement from the top edge of the housing.
Use a drill that's just larger than the threaded mounting shafts - center-punch and drill both holes in your fender. These threaded shafts will go through them and have nuts applied on the back-side to hold the assembly down to the fender (your cut foam-rubber gasket in between the tombstone and fender, of course).
Plug in all the wire leads to their appropriate colors on the fender wiring harness, put the threaded mounting rods into the tombstone housing, and slide them through the gasket and holes you just drilled in the fenders. Mount the nuts and lockwashers to these two threaded rods on the underside of the fender. Use blue loc-tite.
Before tightening them down, do some final tucking in of wires behind the tombstone housing so they don't get pinched and/or exposed.
Tighten down the two mounting bolts.
|
Step 16:
Enjoy!
Remount your fender and reconnect the fender wiring harness at the seat and fender mount area.
Everything should work now. If it doesn't, remove the tombstone and check all wiring connections. You may have to try to swap the taillight wires to get it to work correctly - if they weren't push-pinned correctly originally.
|